Docker Containerization
Containerizing a Three-Tier Web Application with Docker: A Step-by-Step Guide
In today’s fast-paced world of software development, containerization has become a crucial technique for building, deploying, and scaling applications efficiently. In this blog post, I’ll walk you through the process of containerizing a three-tier web application using Docker. We’ll cover everything from setting up Dockerfiles for each tier to integrating them using Docker Compose.
Introduction
Containerization has revolutionized the way we develop and deploy software, offering a lightweight and portable solution for packaging applications and their dependencies. A three-tier web application typically consists of a presentation tier, an application tier, and a data tier. By containerizing each tier, we can streamline deployment and ensure consistency across different environments.
Background
For this tutorial, I’ve chosen my web application available on GitHub GitHub URL. This application follows a three-tier architecture, with a front-end(React) presentation tier, a back-end(Node, Express) application tier, and a database(MongoDB) as the data tier.
Containerization Strategy
To containerize our three-tier web application, we’ll leverage Docker, a popular containerization platform known for its simplicity and flexibility. We’ll start by creating Dockerfiles for each tier, specifying the necessary dependencies and configurations.
Containerizing the Presentation Tier
The presentation tier of our web application consists of the front-end code responsible for rendering the user interface. To containerize it, we’ll create a Dockerfile that sets up the environment, installs dependencies, and copies the application code into the container.
Dockerfile
1
2
3
4
5
6
7
8
9
10
11
12
13
14
15
FROM node:18-alpine

WORKDIR /app

COPY package*.json ./

RUN npm install

COPY . .

ENV PORT=5173

EXPOSE 5173

CMD ["npm", "run", "dev"]
Breakdown of the Dockerfile
1
FROM node:18-alpine
This line specifies the base image for the Docker container. In this case, we’re using the Node.js 18 image based on Alpine Linux, which is a lightweight Linux distribution. This image provides a minimal Node.js runtime environment, suitable for running Node.js applications efficiently.
1
WORKDIR /app
This command sets the working directory inside the Docker container to /app. Subsequent commands will be executed relative to this directory.
1
COPY package*.json ./
This line copies the package.json and package-lock.json files from the host machine to the /app directory inside the container. These files contain information about the Node.js application’s dependencies.
1
RUN npm install
This command runs npm install inside the container, which installs the dependencies listed in the package.json file. It ensures that all required Node.js modules are installed in the container environment.
1
COPY . .
This command copies the rest of the application code (excluding package.json and package-lock.json) from the host machine to the /app directory inside the container. This includes all source code, configuration files, and static assets necessary for running the application.
1
ENV PORT=5173
This line sets the environment variable PORT to 5173 inside the container. This variable specifies the port on which the Node.js application will listen for incoming HTTP requests.
1
EXPOSE 5173
This command exposes port 5173 from the Docker container to allow external access. It informs Docker that the Node.js application running inside the container will be listening on port 5173 for incoming connections.
1
CMD ["npm", "run", "dev"]
Finally, this command specifies the default command to be executed when the Docker container starts. In this case, it runs the npm run dev script, which typically starts a development server for the Node.js application.
In summary, this Dockerfile sets up a Docker container with Node.js environment, installs dependencies, copies the application code, sets environment variables, exposes ports, and specifies the default command to run the Node.js application.
Building Docker File
Now that we have the dockerfile ready, we can follow the following steps to build the docker file into an image and then run it.
- Save the dockerfile in the project directory. In our case it would be ./frontend
- Open a terminal or command promt in that directory.
Run the following command for building the project.
1
docker build -t <your_image_name> .
In the above code, -t indicates tagName.you can put your desired imagename in “your_image_name” placeholder.
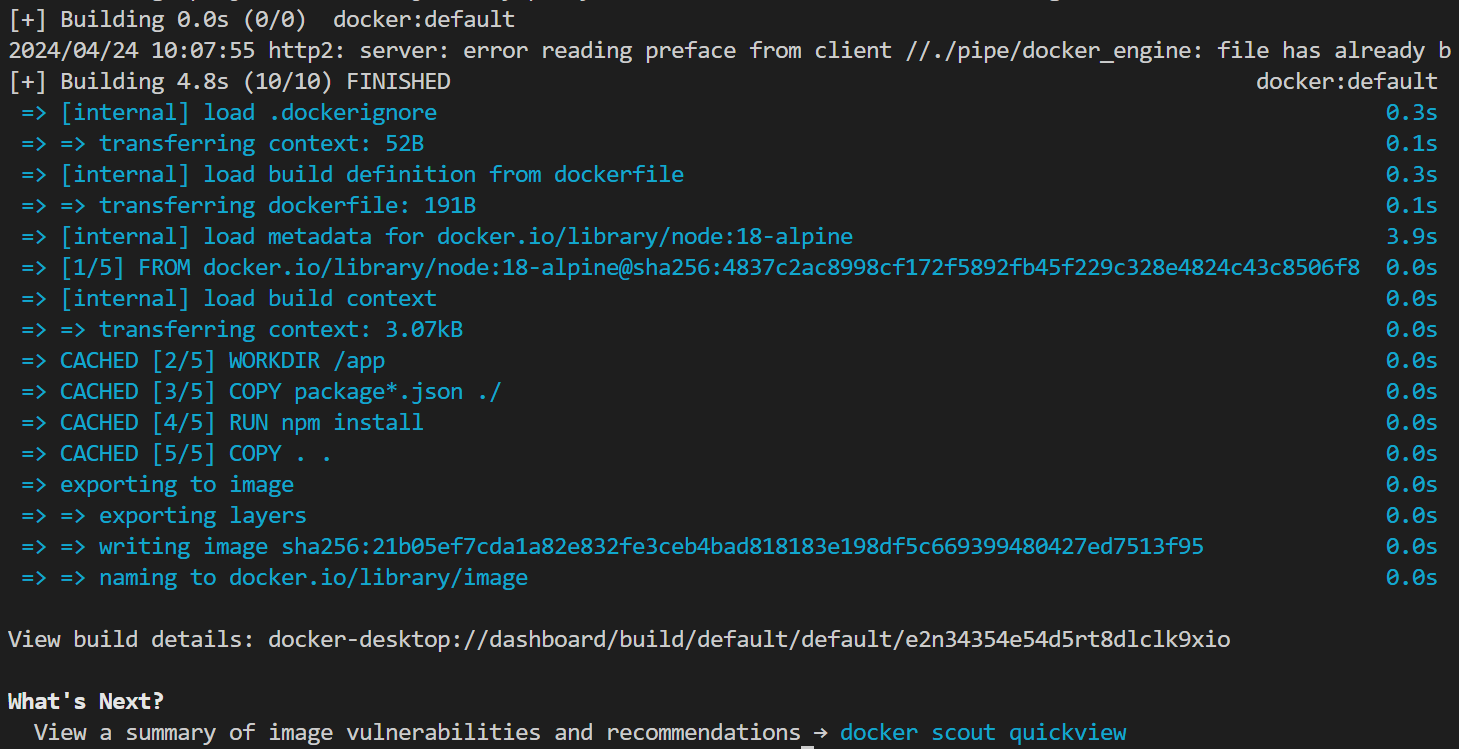
On running this command, you should get similar output like this:
Once its built successfully, type in followin command.
1
docker run -p 5173:5173 <your_image_name>
This code wil start your app on port 5173 of your pc.
-p indicates port number
In 5173:5173, the number before “:” indicates the port number of your pc from which you want to access the dockercontainer and number after “:” indicated which port on the container should be accessed.
Now we can go to port 5173 see our app:

And thats it. with these easy steps you can run your application on a container. However, at the moment we wont be able to login or signin as we dont have a backend container running yet. So we can follow the same step to start up the backend container, and then the data container.
Containerizing the Application Tier
The application tier contains the business logic and server-side code of our web application. We’ll use another Dockerfile to containerize it, installing any necessary runtime environments and libraries.
Dockerfile:
1
2
3
4
5
6
7
8
9
10
11
12
13
14
15
FROM node:18-alpine

WORKDIR /app

COPY package*.json ./

RUN npm install

COPY . .

ENV PORT=5000

EXPOSE 5000

CMD ["npm", "start"]
As you can see from the code itself, most of the commands are same as frontend tier. The only things being changed are port numbers and CMD for starting the app.
Again, we can build and run the container by using same commands from frontend tier, except that this time, the imagename should be diffrent from the previous one.
- Save the dockerfile in the project directory. In our case it would be ./backend
- Open a terminal or command promt in that directory.
Run the following command for building the project.
1
docker build -t <your_image_name> .
Once its built successfully, type in followin command.
1
docker run -p 5000:5000 <your_image_name>
And with this, our containerized backend is runnning.
Containerizing the Data Tier
For the data tier, which includes our database, we’ll use an existing Docker image from the Docker Hub repository. This image will provide a pre-configured database server that we can easily integrate into our containerized environment. For this we will do the following steps:
- open Terminal or commandprompt
- run the following command
1
docker run -d -p 27017:27017 --name mongo mongo:latest
Hence, with this we have containerized our Three tier WebApplication using Docker.
Now that, we have started the containers individually, they cannot interact with each other at the moment since each container runs in isolated environnment. Also, we can need to reduce the steps to run each tier of the app. For this we can utilize docker compose.
docker compose
To integrate the containerized components of our web application, we’ll use Docker Compose. Docker Compose allows us to define and run multi-container Docker applications with a single command, simplifying the deployment process.
In the main root folder, create a file name named as compose.yaml
1
2
3
4
5
6
7
8
9
10
11
12
13
14
15
16
17
18
19
20
21
22
23
24
25
26
services:
  mongodb:
    container_name: mongo
    image: mongo:latest
    ports:
      - "5707:27017"

  backend:
    container_name: 21bcp270backendcontainer
    image: 21bcp270backendimage
    build: ./backend
    ports:
      - "5001:5000"
    depends_on:
      - mongodb

  frontend:
    container_name: 21bcp270frontendcontainer
    image: 21bcp270frontendimage
    build: ./frontend
    env_file:
      - ./frontend/.env
    ports:
      - "5173:5173"
    depends_on:
      - backend
Code Breakdown
MongoDB Service
1
2
3
4
5
6
services:
  mongodb:
    container_name: mongo
    image: mongo:latest
    ports:
      - "5707:27017"
container_name: Specifies the name for the MongoDB container as mongo.
image: Specifies the Docker image for MongoDB, using the latest version tagged as mongo:latest.
ports: Maps port 5707 on the host machine to port 27017 on the MongoDB container, allowing external access to MongoDB.
Backend Service
1
2
3
4
5
6
7
8
backend:
  container_name: 21bcp270backendcontainer
  image: 21bcp270backendimage
  build: ./backend
  ports:
    - "5001:5000"
  depends_on:
    - mongodb
container_name: Specifies the name for the backend container as 21bcp270backendcontainer.
image: Specifies the name for the Docker image to be built for the backend service, which will be tagged as 21bcp270backendimage.
build: Specifies the path to the Dockerfile for building the backend image, which is located in the ./backend directory.
ports: Maps port 5001 on the host machine to port 5000 on the backend container, allowing external access to the backend service.
depends_on: Defines a dependency on the mongodb service, ensuring that the backend service starts only after the MongoDB service is up and running.
Frontend Service
1
2
3
4
5
6
7
8
9
10
frontend:
  container_name: 21bcp270frontendcontainer
  image: 21bcp270frontendimage
  build: ./frontend
  env_file:
    - ./frontend/.env
  ports:
    - "5173:5173"
  depends_on:
    - backend
container_name: Specifies the name for the frontend container as 21bcp270frontendcontainer.
image: Specifies the name for the Docker image to be built for the frontend service, which will be tagged as 21bcp270frontendimage.
build: Specifies the path to the Dockerfile for building the frontend image, which is located in the ./frontend directory.
env_file: Specifies the path to an environment file (./frontend/.env) containing environment variables for the frontend service.
ports: Maps port 5173 on the host machine to port 5173 on the frontend container, allowing external access to the frontend service.
depends_on: Defines a dependency on the backend service, ensuring that the frontend service starts only after the backend service is up and running.
Build and Run
To Run this file run the following commands:
1
docker-compose up -d --build
You will get this output: 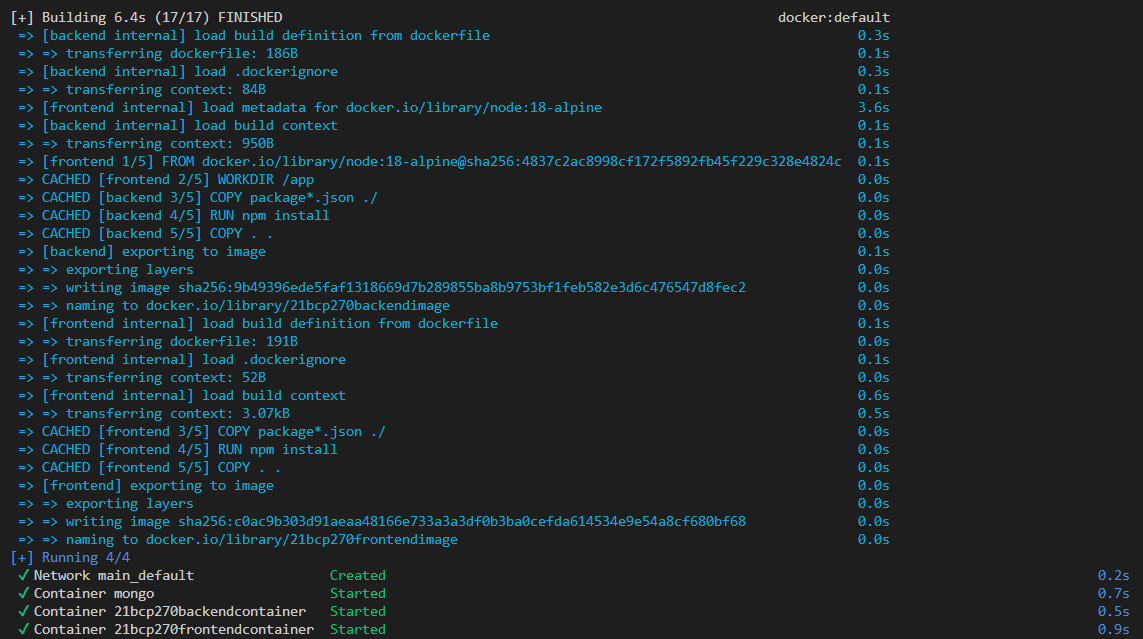
With this our Web app is integrated together and running.
Testing
Now we can signup for a new user and it will show up in the backend as well.
Frontend: 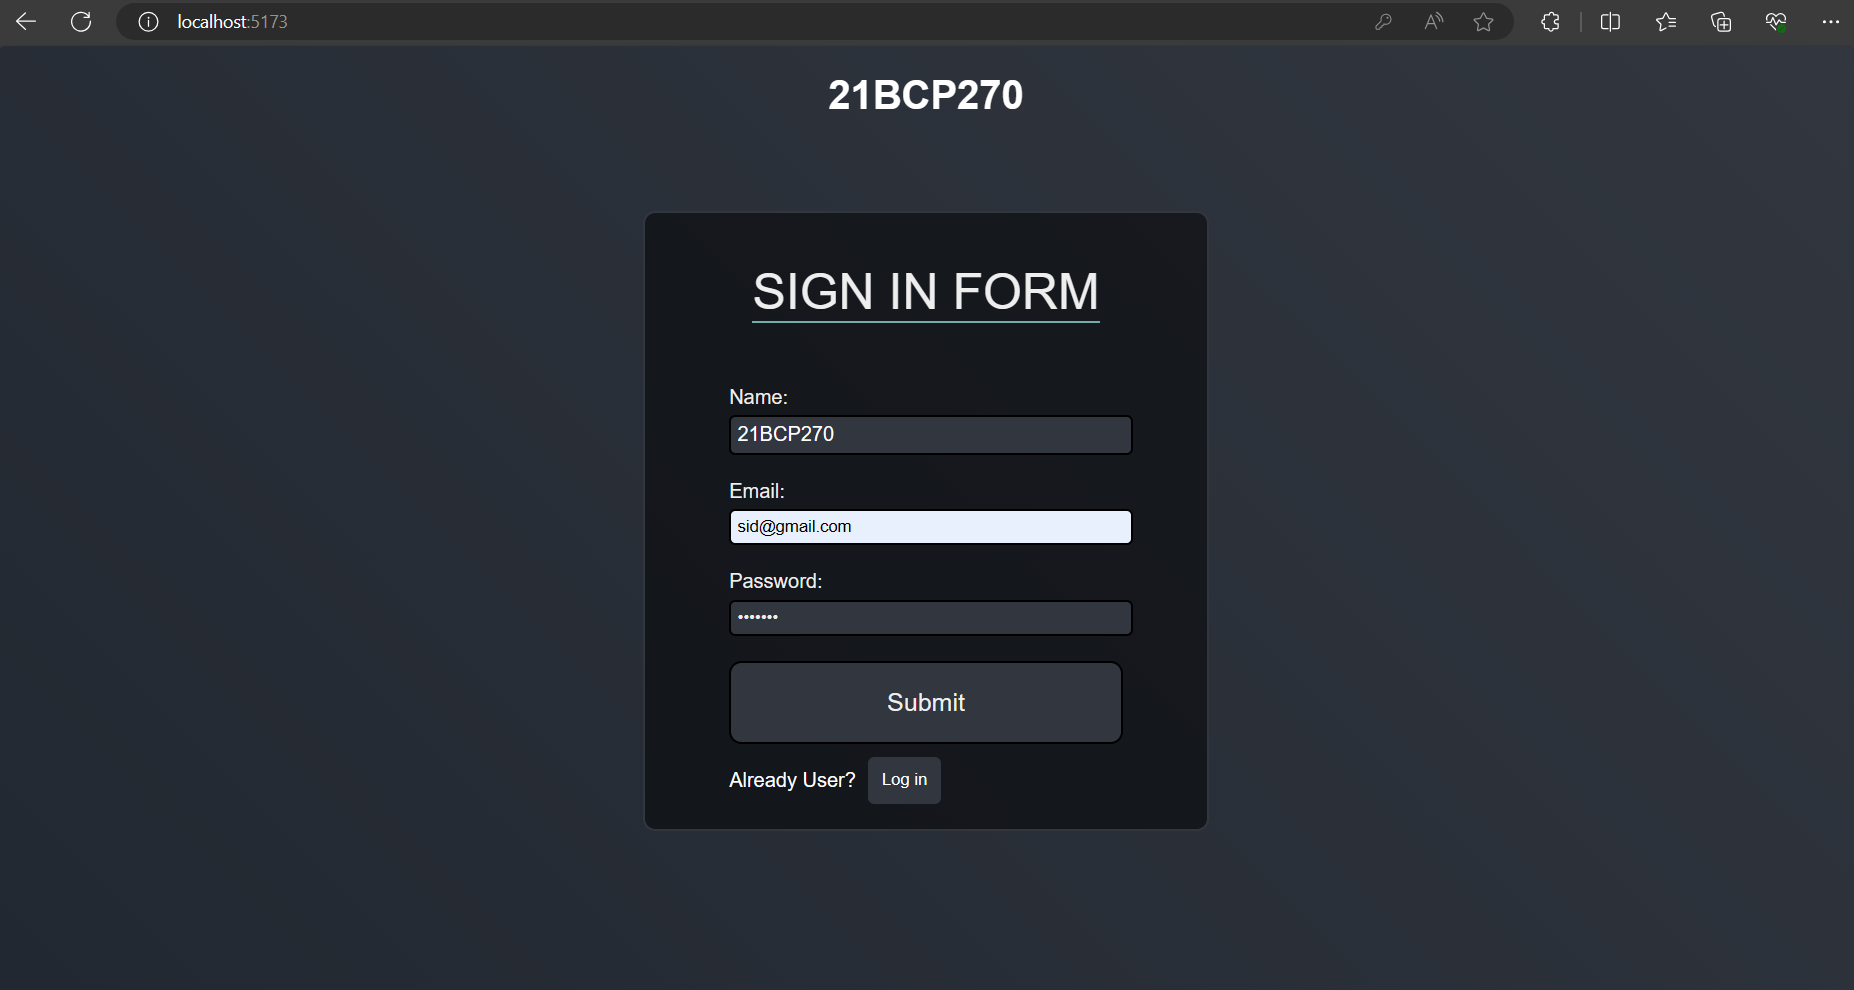
Backend: 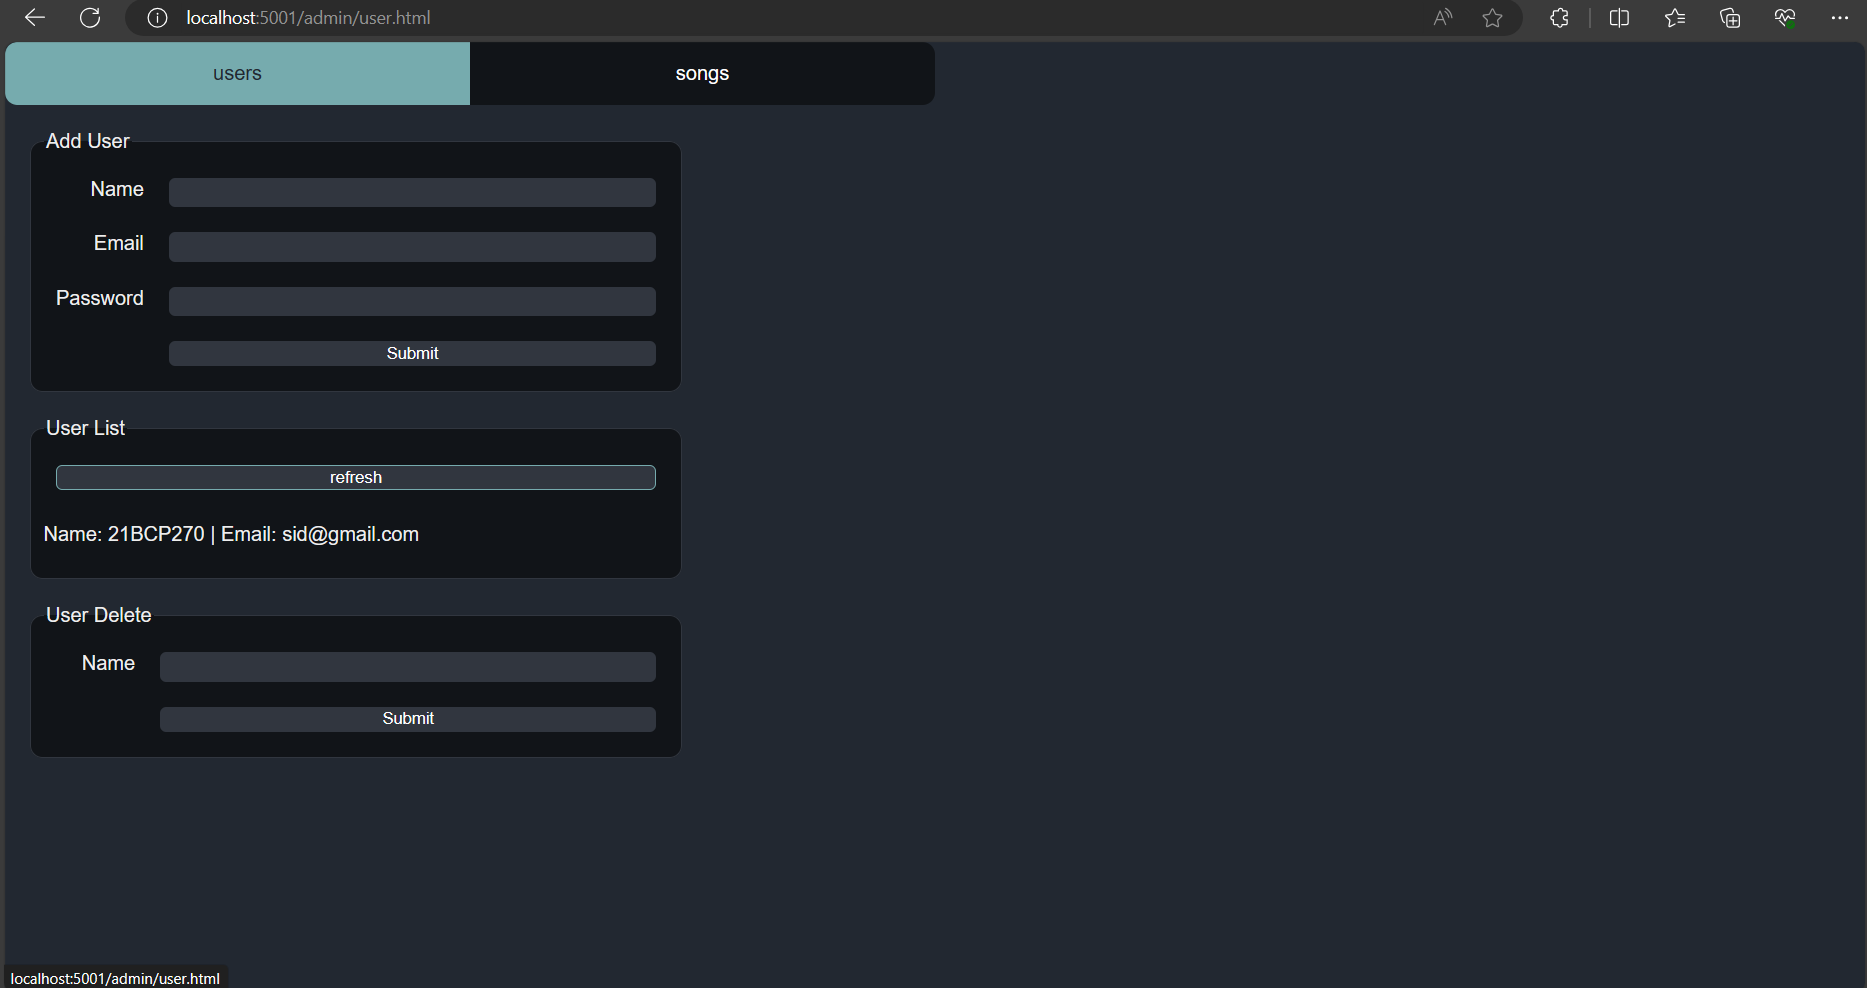
Conclusion
By following these steps, we’ve successfully containerized a three-tier web application using Docker. Containerization offers numerous benefits, including improved consistency, scalability, and portability of applications across different environments. With Docker, developers can streamline the development and deployment process, making it easier to build robust and reliable web applications.